เอา Code ตัวอย่าง Button ใน Arduino sample มา แก้
เมื่อกด Pin 11 จะ เป็น toogle on / off
const int buttonPin = 11; // the number of the pushbutton pin
const int ledPin = 13; // the number of the LED pin
bool LastButtonState =0; // Keep Previous state
// variables will change:
int buttonState = 0; // variable for reading the pushbutton status
void setup() {
// initialize the LED pin as an output:
pinMode(ledPin, OUTPUT);
// initialize the pushbutton pin as an input:
pinMode(buttonPin, INPUT);
}
void loop() {
// read the state of the pushbutton value:
bool readState = digitalRead(buttonPin);
if(LastButtonState!=readState &&readState==LOW) // once press active
{
buttonState = !buttonState; // switch 0 or 1
}
LastButtonState=readState ; // keep to next compare
// check if the pushbutton is pressed. If it is, the buttonState is HIGH:
if (buttonState == HIGH) {
// turn LED on:
digitalWrite(ledPin, HIGH);
} else {
// turn LED off:
digitalWrite(ledPin, LOW);
}
}
วันพฤหัสบดีที่ 16 พฤษภาคม พ.ศ. 2562

วันเสาร์ที่ 27 เมษายน พ.ศ. 2562
Nextion กับ Serial USB,TTLserial และ Code
Nextion เป็นจอ LCD Touch Screen ที่ราคาถูกมาก
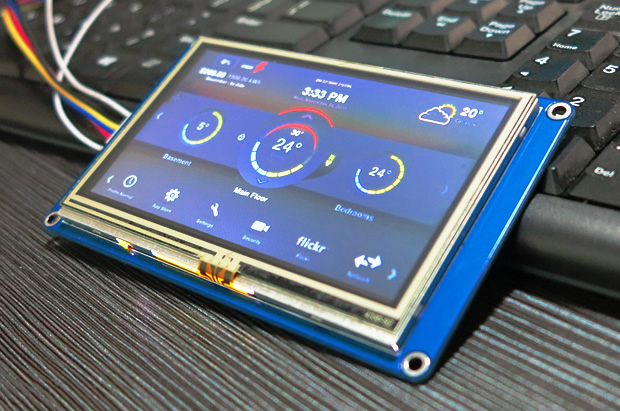
การต่อสายกับ Usb TTL
USB = Nextion
ดำ. =ดำ
แดง. =แดง
เขียว. =เหลือง
ขาว= นำ้เงิน
การต่อสายกับ Usb TTL
USB = Nextion
ดำ. =ดำ
แดง. =แดง
เขียว. =เหลือง
ขาว= นำ้เงิน
หรือ จำง่ายๆสาย TTL ลำดับ แดง(5v) ขาว เขียว ดำ(G)
การออกแบบ จอ ให้ ใช้
Nextion Editor
กรณี
จะเป็นถาษา basic ง่าย
เช่น เปลี่ยน page
โดยกดที่ปุ่มใน Event
page 0
ไป page 0
ที่สำคัญ กรณี Font ต้อง Generate Font และ Add เข้ามาใน Font Tab
เมื่อใส่ Text ต้องใส่ Font id ให้ถูก
สำหรับ ปุ่ม มี 2 Mode ได้แก่ Push กับ Pop ต้องส่ง Id ด้วย
สำหรับรูปภาพ
ให้วาง Picture ไป ก่อน
แล้ว จะเกิด Tab Picture ให้ กด + และ นำรูปเข้า
ต้องแก้ Size ให้ ได้ก่อน โปรแกรมจะ ไม่ resize ให้
สำหรับ การเปลี่ยนค่า
cov s0.val,t0.txt,0 เป็นการเปลี่ยนค่า int to text
การเปลี่ยนค่า จาก Serial
datarate. 9600
t0.txt="hello" ตามด้วย FF FF FF
การรับค่าจาก Serial
Print "1234.00"
กรณีต่อ กับ Arduino Nano ระวัง สลับขา

Code ใน กรณีที่จะใช้ Library ของ Arduino ต้องไป ทำการ Load
Link:https://github.com/itead/ITEADLIB_Arduino_Nextion
มา เป็น Zip และแตกเอง ลงใน
Folder Arduino\Libraries ของ Mac อยู่ใน Document และ Rename เป็น Nextion
ต้องแก้ Comment ใน Nextionconfig.h ด้วย ดูใน Web Link
Comment debug ออก และ serial2->serial1
ระบบ จะเป็น การ Hook ตัวแปร
NexButton b0 = NexButton(0,3, "b1");
int cDelay;
char buffer[100] = {0};
NexTouch *nex_listen_list[] =
{
&b0,
NULL
};
void b0PopCallback(void *ptr)
{
.. ที่จะทำ
.. อ่านค่าจะ ptr ได้
}
ที่ Setup()
Serial.begin(9600);
nexInit();
// Register hook
b0.attachPush(b0PopCallback);
ที่ loop
nexLoop(nex_listen_list);
จะส่งค่า เปลี่ยนต้องใช้ command line
memset(buffer, 0, sizeof(buffer));
itoa(cDelay, buffer, 10);
Serial.print("t0.txt=\"");
Serial.print(buffer);
Serial.print("\"");
Serial.write(0xff);
Serial.write(0xff);
Serial.write(0xff);
ใน Nextion สามารถ อ่านค่า Serial ได้เหมือนกัน แต่ ต้องใช้ Timer ช่วย
เช่น gbrl CNC จะมี คำสั่ง query พิกัด ด้วย ?\r
ใส่ Timer tm0 tm1
tm1 เป็นตัว read serial
และ ปุ่ม b0 สำหรับ query
event ของ tm1 จะเกิดก่อน
covx usize,buffersize.txt,0,0 if(usize>=3) { // Data received ucopy data.txt,0,usize,0 // Disable timers tm0.en=0 tm1.en=0 recmod=0 }
ใน event ของ tm0 ปิด Read กรณีที่ time-out
covx usize,buffersize.txt,0,0 recmod=0 tm0.en=0 tm1.en=0
ในการ Debug ใช้วิธีง่ายๆ โดยการใช้ ucopy ได้ แต่จะไม่ได้ Clear current data จะต่อท้ายไป จนถึง 4096 byte. วิธีแก้ ต้องสั่ง เพื่อล้าง data
ตัวอย่าง debug gcode
การออกแบบ จอ ให้ ใช้
Nextion Editor
กรณี
จะเป็นถาษา basic ง่าย
เช่น เปลี่ยน page
โดยกดที่ปุ่มใน Event
page 0
ไป page 0
ที่สำคัญ กรณี Font ต้อง Generate Font และ Add เข้ามาใน Font Tab
เมื่อใส่ Text ต้องใส่ Font id ให้ถูก
สำหรับ ปุ่ม มี 2 Mode ได้แก่ Push กับ Pop ต้องส่ง Id ด้วย
สำหรับรูปภาพ
ให้วาง Picture ไป ก่อน
แล้ว จะเกิด Tab Picture ให้ กด + และ นำรูปเข้า
ต้องแก้ Size ให้ ได้ก่อน โปรแกรมจะ ไม่ resize ให้
สำหรับ การเปลี่ยนค่า
cov s0.val,t0.txt,0 เป็นการเปลี่ยนค่า int to text
การเปลี่ยนค่า จาก Serial
datarate. 9600
การรับค่าจาก Serial
Print "1234.00"
กรณีต่อ กับ Arduino Nano ระวัง สลับขา

Code ใน กรณีที่จะใช้ Library ของ Arduino ต้องไป ทำการ Load
Link:https://github.com/itead/ITEADLIB_Arduino_Nextion
มา เป็น Zip และแตกเอง ลงใน
Folder Arduino\Libraries ของ Mac อยู่ใน Document และ Rename เป็น Nextion
ต้องแก้ Comment ใน Nextionconfig.h ด้วย ดูใน Web Link
Comment debug ออก และ serial2->serial1
ระบบ จะเป็น การ Hook ตัวแปร
NexButton b0 = NexButton(0,3, "b1");
int cDelay;
char buffer[100] = {0};
NexTouch *nex_listen_list[] =
{
&b0,
NULL
};
void b0PopCallback(void *ptr)
{
.. ที่จะทำ
.. อ่านค่าจะ ptr ได้
}
ที่ Setup()
Serial.begin(9600);
nexInit();
// Register hook
b0.attachPush(b0PopCallback);
ที่ loop
nexLoop(nex_listen_list);
จะส่งค่า เปลี่ยนต้องใช้ command line
memset(buffer, 0, sizeof(buffer));
itoa(cDelay, buffer, 10);
Serial.print("t0.txt=\"");
Serial.print(buffer);
Serial.print("\"");
Serial.write(0xff);
Serial.write(0xff);
Serial.write(0xff);
ใน Nextion สามารถ อ่านค่า Serial ได้เหมือนกัน แต่ ต้องใช้ Timer ช่วย
เช่น gbrl CNC จะมี คำสั่ง query พิกัด ด้วย ?\r
ใส่ Timer tm0 tm1
tm1 เป็นตัว read serial
และ ปุ่ม b0 สำหรับ query
// Send Command to gbrl ask for positionprint "?\r"// start receive datarecmod=1 data.txt="" buffersize.txt="" tm0.tim=500 tm0.en=1 // Enable Readserial by tm1 tm1.tim=100 tm1.en=1
event ของ tm1 จะเกิดก่อน
covx usize,buffersize.txt,0,0 if(usize>=3) { // Data received ucopy data.txt,0,usize,0 // Disable timers tm0.en=0 tm1.en=0 recmod=0 }
ใน event ของ tm0 ปิด Read กรณีที่ time-out
covx usize,buffersize.txt,0,0 recmod=0 tm0.en=0 tm1.en=0
ในการ Debug ใช้วิธีง่ายๆ โดยการใช้ ucopy ได้ แต่จะไม่ได้ Clear current data จะต่อท้ายไป จนถึง 4096 byte. วิธีแก้ ต้องสั่ง เพื่อล้าง data
code_c
ตัวอย่าง debug gcode
code_c
print "?"
printh 0d 0a
delay=50
ucopy t0.txt,0,20,0
ก็จะแสดงผลล่างสุด
ปัญหา ของ Version Firmware ใหม่ ของ Nextion 2023, ในการต่อ Serial ต้อง set
ปัญหา ของ Version Firmware ใหม่ ของ Nextion 2023, ในการต่อ Serial ต้อง set
baud=115200
ก่อน จะ print หรือ ucopy คำสั่ง bauds เดิมที่สั่งหน้าแรก ไม่ทำงาน
การ ส่ง Enter ให้ส่งโดยใช้ printh
printh 0d 0a
วันพฤหัสบดีที่ 25 เมษายน พ.ศ. 2562
Intenet net time ในแบบ Text
https://nist.time.gov/actualtime.cgi?lzbc=siqm9b
code เป็นแบบนี้
code เป็นแบบนี้
public static DateTime GetNistTime(){DateTime dateTime = DateTime.MinValue;HttpWebRequest request = (HttpWebRequest)WebRequest.Create("http://nist.time.gov/actualtime.cgi?lzbc=siqm9b");request.Method = "GET";request.Accept = "text/html, application/xhtml+xml, */*";request.UserAgent = "Mozilla/5.0 (compatible; MSIE 10.0; Windows NT 6.1; Trident/6.0)";request.ContentType = "application/x-www-form-urlencoded";request.CachePolicy = new RequestCachePolicy(RequestCacheLevel.NoCacheNoStore); //No cachingHttpWebResponse response = (HttpWebResponse)request.GetResponse();if (response.StatusCode == HttpStatusCode.OK){StreamReader stream = new StreamReader(response.GetResponseStream());string html = stream.ReadToEnd();//<timestamp time=\"1395772696469995\" delay=\"1395772696469995\"/>string time = Regex.Match(html, @"(?<=\btime="")[^""]*").Value;double milliseconds = Convert.ToInt64(time) / 1000.0;dateTime = new DateTime(1970, 1, 1).AddMilliseconds(milliseconds).ToLocalTime();}return dateTime;}
วันพุธที่ 3 เมษายน พ.ศ. 2562
unix script สำหรับ jump directory
ต้องสร้างเป็น alias
alias web="cd /home/mywebsite/www_data/web1
web
ใน file ชื่อ w.sh
วิธี run
source w.sh
alias web="cd /home/mywebsite/www_data/web1
web
ใน file ชื่อ w.sh
วิธี run
source w.sh
วันอังคารที่ 19 มีนาคม พ.ศ. 2562
setup gmail ให้ส่ง mail ได้
ต้องไปที่ admin.google.com
แล้วไปที่
security->Advance Security Setting->enforce access less security...
จะส่งจาก web ได้
วันอาทิตย์ที่ 24 กุมภาพันธ์ พ.ศ. 2562


วันพุธที่ 6 กุมภาพันธ์ พ.ศ. 2562
การสร้าง Credential สำหรับ upload file google Drive
การสร้าง Credential สำหรับ Upload file ของ google Drive โดยใช้ c# ยากพอสมควร เพราะต้องเข้า วิธิคิดของ OAuth ที่ใช้ 2 Leg Key =Id,Secret
วิธีทำ
ทดลองตาม tutorial ของ Quick start https://developers.google.com/drive/api/v3/quickstart/dotnet
แก้ "user" ให้เป็น google account ของ ที่ generate
1. ต้อง Enable Google Drive API -> console.cloud.google.com
สร้าง Project เช่น Project1
 2. ไป Library เลือก Google drive api

เข้าไป ตามเมนู

วิธีทำ
ทดลองตาม tutorial ของ Quick start https://developers.google.com/drive/api/v3/quickstart/dotnet
แก้ "user" ให้เป็น google account ของ ที่ generate
1. ต้อง Enable Google Drive API -> console.cloud.google.com
สร้าง Project เช่น Project1


เข้าไป ตามเมนู
Library->google drive ->manage->credentials->credentials in api and services->Create Credentials->OAuth Client Id
->Other

แล้ว Back กลับมากดที่ หน้ารายการของ Credential ที่พึ่งทำจะมีให้ Download json

ใน Code จะไม่มี การ Update
ต้องแก้ อีกนิดหนึ่ง Folder id ได้มาจากการ run ครั้งแรก

ใน Code จะไม่มี การ Update
ต้องแก้ อีกนิดหนึ่ง Folder id ได้มาจากการ run ครั้งแรก
//file upload
// string path = "";
var folderId = "1lcxxx";
var fileMetadata = new Google.Apis.Drive.v3.Data.File()
{
Name = "x.jpg",
Parents = new List<string>
{
folderId
}
};
FilesResource.CreateMediaUpload request;
using (var stream = new System.IO.FileStream("c:/temp/x.jpg",
System.IO.FileMode.Open))
{
request = service.Files.Create(
fileMetadata, stream, "image/jpeg");
request.Fields = "id";
var resu = request.Upload();
// Console.WriteLine(resu.Exception.Message);
}
Console.Read();
var filex = request.ResponseBody;
Console.WriteLine("File ID: " + filex.Id);
Console.Read();
}
สมัครสมาชิก:
บทความ (Atom)