Key ของ Regex. ในกรณีที่มี วงเล็บ ต้องใช้ \ เช่น ( [ { } ] )
"FX\((.*?)\)";
public static void Main(string[] args)
{
var ps = @"FX\((.*?)\)";
Regex regex = new Regex(ps);
Match m = regex.Match("morenonxmldata FX(0002)morenonxmldata FX(2929)");
if (m.Success)
{
Console.WriteLine(m.Groups[1]); // inner text
Console.WriteLine("Value = " + m.Value); // แสดง ค่า
Console.WriteLine("Length = " + m.Length); // ความยาว
Console.WriteLine("Index = " + m.Index);// แสดงตำแหน่ง
}
}
ถ้าต้องการ ทำต่อ ให้ใช้
Match match = match.NextMatch();
if (match.Success)
{
Console.WriteLine(match.Value);
}
หรือ
var v = Regex.Matches("morenonxmldata FX(0002)morenonxmldata FX(2929)",ps);
ทดลอง เปลี่ยน และ ต่อ ตัวหนังสือ
public static void Main(string[] args)
{
string ps = @"FX\((.*?)\)";
Regex regex = new Regex(ps);
string nps="";
string txt="morenonxmldata FX(0002)morenonxmldata FX(2929)aa";
int sIndex=0;
var v = Regex.Matches(txt,ps);
foreach(Match m in v)
{
Console.WriteLine(m.Groups[1]);
Console.WriteLine("Value = " + m.Value);
Console.WriteLine("Length = " + m.Length);
Console.WriteLine("Index = " + m.Index);
nps+=txt.Substring(sIndex,m.Index-sIndex);
nps+=m.Groups[1].ToString();
Console.WriteLine(nps);
sIndex=m.Index+m.Length;
}
if(sIndex<txt.Length){ // ต่อ txt ที่เหลือ
nps+=txt.Substring(sIndex);
}
Console.WriteLine(nps);
}
วันเสาร์ที่ 7 ธันวาคม พ.ศ. 2562
วันจันทร์ที่ 9 กันยายน พ.ศ. 2562
ติดตั้ง NanoPi NEO
NanoPI NEO เป็น ARM Linux ที่เล็กมาก

ใช้ SD ในการ Boot และ เป็น harddisk
ให้ดี จะมาพร้อมกับ จอ OLED ที่จะพอมองเห็นว่า ทำงานอยู่หรือไม่ ที่สำคัญ จะได้ บอก IP ADDRESS ที่ connect Lan เพื่อต่อ SSH หรือ ดูจาก pc ใช้ Ipconfig (ifconfig)


ใช้ SD ในการ Boot และ เป็น harddisk
ให้ดี จะมาพร้อมกับ จอ OLED ที่จะพอมองเห็นว่า ทำงานอยู่หรือไม่ ที่สำคัญ จะได้ บอก IP ADDRESS ที่ connect Lan เพื่อต่อ SSH หรือ ดูจาก pc ใช้ Ipconfig (ifconfig)

Image ที่ใช้ได้ nanopi-neo_sd_ubuntu-oled-xenial_4.14_armhf_20190522.img
Burn Image >SD 8G ด้วย BalenaEtcher
ต่อ Lan ก่อน
ssh root@ip.address
password fa
ใช้ครั้งแรก
apt-get update
apt-get upgrade
ใช้ Wifi เป็น ตระกูล N150 tplink
config Network wifi
ifconfig
nmcli d wifi list ดู wifi
nucli d wifi connect <ssid> password <pwd> face <wifi interface>
หรือ
nmtui
จะเป็น UI

แล้ว activated ได้ง่ายกว่า
ลง PHP หรือ Mysql ก็ใช้ apt-get แบบ Ubuntu
วันเสาร์ที่ 7 กันยายน พ.ศ. 2562
docker sqlserver บน OSX หรือ Windows ด้วย SQL Server linux
Microsoft ออก SQL Server linux ใช้งาน ง่ายมาก
ติดตั้ง Docker แล้วเลือกติดตั้ง sqlserver Linux แล้ว start docker ก่อน
แล้ว ลง SQL Server Management
เลือก attach database
ปิด Service
docker container stop sql_server_demo
ติดตั้ง Docker แล้วเลือกติดตั้ง sqlserver Linux แล้ว start docker ก่อน
docker pull microsoft/mssql-server-linux
docker ps -a จะได้ <Key> เป็นตัวเลข
docker run -d --name sql_server_demo -e 'ACCEPT_EULA=Y' -e 'SA_PASSWORD=Your_Password' -p 1433:1433 microsoft/mssql-server-linux
docker cp <Path>you_database.mdf <key>:/var/opt/mssql/data
แล้ว ลง SQL Server Management
เลือก attach database
ปิด Service
docker container stop sql_server_demo
การ Move Docker หรือ ย้าย Docker
เมื่อ Docker container ที่ใช้งาน จะ Move ออกไปอีกเครื่อง ทำได้ ด้วย คำสั่ง
docker export <containername> <filename>
ถ้าต้องการ Zip ก็ สามารถ Zip ได้
docker export <containername> | gzip > <containername>.gz
หรือ Zip Manual ก็ได้
เวลานำเข้า
docker import <containername>
แต่ถ้าต้องการย้ายทั้ง docker ใช้ save และ load
docker image ls
ดูชื่อก่อน
docker save -o <filename.tar> <Imagename>:latest
docker load -i <filename.tar>
ลบ Image ระวัง จะหายหมด กลับมาไม่ได้
docker image rm <ชื่อImage>
วันจันทร์ที่ 5 สิงหาคม พ.ศ. 2562
ปัญหา Compile C# form dotnet 4 กลับเป็น Dotnet 3.5
ปัญหา backward Compile C# จาก dotnet 4.0 กลับเป็น 3.5 จะมี error
Unable to cast object of type 'System.Windows.Forms.SplitContainer' to type 'System.ComponentModel.ISupportInitialize'."
Unable to cast object of type 'System.Windows.Forms.SplitContainer' to type 'System.ComponentModel.ISupportInitialize'."
เกิดจาก Class ที่ควบคุม หน้าจอ เกียวกับ Windows 8-10 ที่มี มากกว่า ใน Window 7
จะไม่ผ่าน
วิธีแก้
ต้อง comment โดย replace // หน้า ทั้ง Solution
((System.ComponentModel.ISupportInitialize)
วันจันทร์ที่ 24 มิถุนายน พ.ศ. 2562

วันพฤหัสบดีที่ 30 พฤษภาคม พ.ศ. 2562

วันพุธที่ 29 พฤษภาคม พ.ศ. 2562
สวิทช์ กด ของ Arduino
วงจร 3 pin เพื่อความ sure ว่ากดและไม่กด ในรูปเมื่อกดจะได้ signal 0 ถ้าต้องการเป็นแบบ กดแล้วได้ 1 ให้สลับ ไฟ G กับ V


โปรแกรม ESP8266 WIFIจิ๋ว หรือ ESP-01
ESP8266 จิ๋ว จะต้องต่อสาย พิเศษ เวลา Program
โดย ตามรูป เวลา Run ก็ให้ตัวหนังสือสีแดงเอาออก

code ที่ test
#include <ESP8266WiFi.h>
const char* ssid = "my home"; // fill in here your router or wifi SSID
const char* password = "xxxxxxx"; // fill in here your router or wifi password
#define RELAY 0 // relay connected to GPIO0
WiFiServer server(80);
void setup()
{
Serial.begin(115200); // must be same baudrate with the Serial Monitor
pinMode(RELAY,OUTPUT);
digitalWrite(RELAY, LOW);
pinMode(LED_BUILTIN, OUTPUT);
digitalWrite(LED_BUILTIN, LOW);
// Connect to WiFi network
Serial.println();
Serial.println();
Serial.print("Connecting to ");
Serial.println(ssid);
WiFi.begin(ssid, password);
while (WiFi.status() != WL_CONNECTED)
{
delay(500);
Serial.print(".");
}
Serial.println("");
Serial.println("WiFi connected");
// Start the server
server.begin();
Serial.println("Server started");
// Print the IP address
Serial.print("Use this URL to connect: ");
// Serial.print("https://192.168.0.178/");
Serial.print(WiFi.localIP());
Serial.println("/");
}
void loop()
{
// Check if a client has connected
WiFiClient client = server.available();
if (!client)
{
return;
}
// Wait until the client sends some data
Serial.println("new client");
while(!client.available())
{
delay(1);
}
// Read the first line of the request
String request = client.readStringUntil('\r');
Serial.println(request);
client.flush();
// Match the request
int value = LOW;
if (request.indexOf("/RELAY=ON") != -1)
{
Serial.println("RELAY=ON");
digitalWrite(RELAY,LOW);
digitalWrite(LED_BUILTIN, LOW);
value = LOW;
}
if (request.indexOf("/RELAY=OFF") != -1)
{
Serial.println("RELAY=OFF");
digitalWrite(RELAY,HIGH);
digitalWrite(LED_BUILTIN, HIGH);
value = HIGH;
}
// Return the response
client.println("HTTP/1.1 200 OK");
client.println("Content-Type: text/html");
client.println(""); // this is a must
client.println("<!DOCTYPE HTML>");
client.println("<html>");
client.println("<head><title>ESP8266 RELAY Control</title></head>");
client.print("Relay is now: ");
if(value == HIGH)
{
client.print("OFF");
}
else
{
client.print("ON");
}
client.println("<br><br>");
client.println("Turn <a href=\"/RELAY=OFF\">OFF</a> RELAY<br>");
client.println("Turn <a href=\"/RELAY=ON\">ON</a> RELAY<br>");
client.println("</html>");
delay(1);
Serial.println("Client disonnected");
Serial.println("");
}
โดย ตามรูป เวลา Run ก็ให้ตัวหนังสือสีแดงเอาออก

ใน Arduino ให้ไปที่ preference และ เพิ่ม Site
https://arduino.esp8266.com/stable/package_esp8266com_index.json
เลือ เป็น Generic 8266
code ที่ test
#include <ESP8266WiFi.h>
const char* ssid = "my home"; // fill in here your router or wifi SSID
const char* password = "xxxxxxx"; // fill in here your router or wifi password
#define RELAY 0 // relay connected to GPIO0
WiFiServer server(80);
void setup()
{
Serial.begin(115200); // must be same baudrate with the Serial Monitor
pinMode(RELAY,OUTPUT);
digitalWrite(RELAY, LOW);
pinMode(LED_BUILTIN, OUTPUT);
digitalWrite(LED_BUILTIN, LOW);
// Connect to WiFi network
Serial.println();
Serial.println();
Serial.print("Connecting to ");
Serial.println(ssid);
WiFi.begin(ssid, password);
while (WiFi.status() != WL_CONNECTED)
{
delay(500);
Serial.print(".");
}
Serial.println("");
Serial.println("WiFi connected");
// Start the server
server.begin();
Serial.println("Server started");
// Print the IP address
Serial.print("Use this URL to connect: ");
// Serial.print("https://192.168.0.178/");
Serial.print(WiFi.localIP());
Serial.println("/");
}
void loop()
{
// Check if a client has connected
WiFiClient client = server.available();
if (!client)
{
return;
}
// Wait until the client sends some data
Serial.println("new client");
while(!client.available())
{
delay(1);
}
// Read the first line of the request
String request = client.readStringUntil('\r');
Serial.println(request);
client.flush();
// Match the request
int value = LOW;
if (request.indexOf("/RELAY=ON") != -1)
{
Serial.println("RELAY=ON");
digitalWrite(RELAY,LOW);
digitalWrite(LED_BUILTIN, LOW);
value = LOW;
}
if (request.indexOf("/RELAY=OFF") != -1)
{
Serial.println("RELAY=OFF");
digitalWrite(RELAY,HIGH);
digitalWrite(LED_BUILTIN, HIGH);
value = HIGH;
}
// Return the response
client.println("HTTP/1.1 200 OK");
client.println("Content-Type: text/html");
client.println(""); // this is a must
client.println("<!DOCTYPE HTML>");
client.println("<html>");
client.println("<head><title>ESP8266 RELAY Control</title></head>");
client.print("Relay is now: ");
if(value == HIGH)
{
client.print("OFF");
}
else
{
client.print("ON");
}
client.println("<br><br>");
client.println("Turn <a href=\"/RELAY=OFF\">OFF</a> RELAY<br>");
client.println("Turn <a href=\"/RELAY=ON\">ON</a> RELAY<br>");
client.println("</html>");
delay(1);
Serial.println("Client disonnected");
Serial.println("");
}
วันอาทิตย์ที่ 26 พฤษภาคม พ.ศ. 2562
unix openWrt, wget กับ PHP
wget -O /tmp/x.txt -q http://website.com/txt.php
จะ write ลงที่ /tmp/x.txt
Unix, OpenWRT ติดต่อ หา เวลา Intenet
ได้ 3 แบบ curl, nc , wget
wget -q -O- time.nist.gov:13 | awk '{print $2,$3}' | grep -v "^ *$" | (read t; date "+%Y-%m-%d %H:%M:%S %Z" -d "$t +0000")
curl -s time.nist.gov:13
nc time.nist.gov 13wget -q -O- time.nist.gov:13 | awk '{print $2,$3}' | grep -v "^ *$" | (read t; date "+%Y-%m-%d %H:%M:%S %Z" -d "$t +0000")
unix,OpenWrt Toggle Shell
Unix Openwrt ทำ Toogle shell ใช้ file เป็น ตัว Toogle
ตัวอย่าง OnOff.sh. อย่าลืม chmod 777 OnOff.sh
ตัวอย่าง OnOff.sh. อย่าลืม chmod 777 OnOff.sh
#!/bin/sh
TOGGLE=/tmp/.toggle
if [ ! -e $TOGGLE ]; then
touch $TOGGLE
/usr/sbin/onSW.sh
else
rm $TOGGLE
/usr/sbin/offSW.sh
fi
วันพฤหัสบดีที่ 16 พฤษภาคม พ.ศ. 2562
Arduino ปุ่มปิดเปิด แบบ Toogle (กดแล้วค้าง)
เอา Code ตัวอย่าง Button ใน Arduino sample มา แก้
เมื่อกด Pin 11 จะ เป็น toogle on / off
const int buttonPin = 11; // the number of the pushbutton pin
const int ledPin = 13; // the number of the LED pin
bool LastButtonState =0; // Keep Previous state
// variables will change:
int buttonState = 0; // variable for reading the pushbutton status
void setup() {
// initialize the LED pin as an output:
pinMode(ledPin, OUTPUT);
// initialize the pushbutton pin as an input:
pinMode(buttonPin, INPUT);
}
void loop() {
// read the state of the pushbutton value:
bool readState = digitalRead(buttonPin);
if(LastButtonState!=readState &&readState==LOW) // once press active
{
buttonState = !buttonState; // switch 0 or 1
}
LastButtonState=readState ; // keep to next compare
// check if the pushbutton is pressed. If it is, the buttonState is HIGH:
if (buttonState == HIGH) {
// turn LED on:
digitalWrite(ledPin, HIGH);
} else {
// turn LED off:
digitalWrite(ledPin, LOW);
}
}
วันเสาร์ที่ 27 เมษายน พ.ศ. 2562
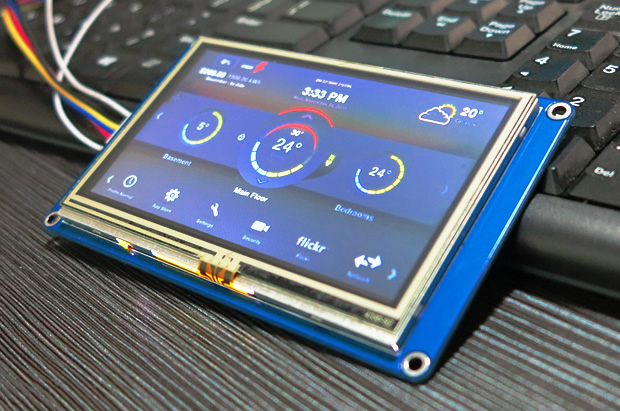
Nextion กับ Serial USB,TTLserial และ Code
Nextion เป็นจอ LCD Touch Screen ที่ราคาถูกมาก
การต่อสายกับ Usb TTL
USB = Nextion
ดำ. =ดำ
แดง. =แดง
เขียว. =เหลือง
ขาว= นำ้เงิน
การต่อสายกับ Usb TTL
USB = Nextion
ดำ. =ดำ
แดง. =แดง
เขียว. =เหลือง
ขาว= นำ้เงิน
หรือ จำง่ายๆสาย TTL ลำดับ แดง(5v) ขาว เขียว ดำ(G)
การออกแบบ จอ ให้ ใช้
Nextion Editor
กรณี
จะเป็นถาษา basic ง่าย
เช่น เปลี่ยน page
โดยกดที่ปุ่มใน Event
page 0
ไป page 0
ที่สำคัญ กรณี Font ต้อง Generate Font และ Add เข้ามาใน Font Tab
เมื่อใส่ Text ต้องใส่ Font id ให้ถูก
สำหรับ ปุ่ม มี 2 Mode ได้แก่ Push กับ Pop ต้องส่ง Id ด้วย
สำหรับรูปภาพ
ให้วาง Picture ไป ก่อน
แล้ว จะเกิด Tab Picture ให้ กด + และ นำรูปเข้า
ต้องแก้ Size ให้ ได้ก่อน โปรแกรมจะ ไม่ resize ให้
สำหรับ การเปลี่ยนค่า
cov s0.val,t0.txt,0 เป็นการเปลี่ยนค่า int to text
การเปลี่ยนค่า จาก Serial
datarate. 9600
t0.txt="hello" ตามด้วย FF FF FF
การรับค่าจาก Serial
Print "1234.00"
กรณีต่อ กับ Arduino Nano ระวัง สลับขา

Code ใน กรณีที่จะใช้ Library ของ Arduino ต้องไป ทำการ Load
Link:https://github.com/itead/ITEADLIB_Arduino_Nextion
มา เป็น Zip และแตกเอง ลงใน
Folder Arduino\Libraries ของ Mac อยู่ใน Document และ Rename เป็น Nextion
ต้องแก้ Comment ใน Nextionconfig.h ด้วย ดูใน Web Link
Comment debug ออก และ serial2->serial1
ระบบ จะเป็น การ Hook ตัวแปร
NexButton b0 = NexButton(0,3, "b1");
int cDelay;
char buffer[100] = {0};
NexTouch *nex_listen_list[] =
{
&b0,
NULL
};
void b0PopCallback(void *ptr)
{
.. ที่จะทำ
.. อ่านค่าจะ ptr ได้
}
ที่ Setup()
Serial.begin(9600);
nexInit();
// Register hook
b0.attachPush(b0PopCallback);
ที่ loop
nexLoop(nex_listen_list);
จะส่งค่า เปลี่ยนต้องใช้ command line
memset(buffer, 0, sizeof(buffer));
itoa(cDelay, buffer, 10);
Serial.print("t0.txt=\"");
Serial.print(buffer);
Serial.print("\"");
Serial.write(0xff);
Serial.write(0xff);
Serial.write(0xff);
ใน Nextion สามารถ อ่านค่า Serial ได้เหมือนกัน แต่ ต้องใช้ Timer ช่วย
เช่น gbrl CNC จะมี คำสั่ง query พิกัด ด้วย ?\r
ใส่ Timer tm0 tm1
tm1 เป็นตัว read serial
และ ปุ่ม b0 สำหรับ query
event ของ tm1 จะเกิดก่อน
covx usize,buffersize.txt,0,0 if(usize>=3) { // Data received ucopy data.txt,0,usize,0 // Disable timers tm0.en=0 tm1.en=0 recmod=0 }
ใน event ของ tm0 ปิด Read กรณีที่ time-out
covx usize,buffersize.txt,0,0 recmod=0 tm0.en=0 tm1.en=0
ในการ Debug ใช้วิธีง่ายๆ โดยการใช้ ucopy ได้ แต่จะไม่ได้ Clear current data จะต่อท้ายไป จนถึง 4096 byte. วิธีแก้ ต้องสั่ง เพื่อล้าง data
ตัวอย่าง debug gcode
การออกแบบ จอ ให้ ใช้
Nextion Editor
กรณี
จะเป็นถาษา basic ง่าย
เช่น เปลี่ยน page
โดยกดที่ปุ่มใน Event
page 0
ไป page 0
ที่สำคัญ กรณี Font ต้อง Generate Font และ Add เข้ามาใน Font Tab
เมื่อใส่ Text ต้องใส่ Font id ให้ถูก
สำหรับ ปุ่ม มี 2 Mode ได้แก่ Push กับ Pop ต้องส่ง Id ด้วย
สำหรับรูปภาพ
ให้วาง Picture ไป ก่อน
แล้ว จะเกิด Tab Picture ให้ กด + และ นำรูปเข้า
ต้องแก้ Size ให้ ได้ก่อน โปรแกรมจะ ไม่ resize ให้
สำหรับ การเปลี่ยนค่า
cov s0.val,t0.txt,0 เป็นการเปลี่ยนค่า int to text
การเปลี่ยนค่า จาก Serial
datarate. 9600
การรับค่าจาก Serial
Print "1234.00"
กรณีต่อ กับ Arduino Nano ระวัง สลับขา

Code ใน กรณีที่จะใช้ Library ของ Arduino ต้องไป ทำการ Load
Link:https://github.com/itead/ITEADLIB_Arduino_Nextion
มา เป็น Zip และแตกเอง ลงใน
Folder Arduino\Libraries ของ Mac อยู่ใน Document และ Rename เป็น Nextion
ต้องแก้ Comment ใน Nextionconfig.h ด้วย ดูใน Web Link
Comment debug ออก และ serial2->serial1
ระบบ จะเป็น การ Hook ตัวแปร
NexButton b0 = NexButton(0,3, "b1");
int cDelay;
char buffer[100] = {0};
NexTouch *nex_listen_list[] =
{
&b0,
NULL
};
void b0PopCallback(void *ptr)
{
.. ที่จะทำ
.. อ่านค่าจะ ptr ได้
}
ที่ Setup()
Serial.begin(9600);
nexInit();
// Register hook
b0.attachPush(b0PopCallback);
ที่ loop
nexLoop(nex_listen_list);
จะส่งค่า เปลี่ยนต้องใช้ command line
memset(buffer, 0, sizeof(buffer));
itoa(cDelay, buffer, 10);
Serial.print("t0.txt=\"");
Serial.print(buffer);
Serial.print("\"");
Serial.write(0xff);
Serial.write(0xff);
Serial.write(0xff);
ใน Nextion สามารถ อ่านค่า Serial ได้เหมือนกัน แต่ ต้องใช้ Timer ช่วย
เช่น gbrl CNC จะมี คำสั่ง query พิกัด ด้วย ?\r
ใส่ Timer tm0 tm1
tm1 เป็นตัว read serial
และ ปุ่ม b0 สำหรับ query
// Send Command to gbrl ask for positionprint "?\r"// start receive datarecmod=1 data.txt="" buffersize.txt="" tm0.tim=500 tm0.en=1 // Enable Readserial by tm1 tm1.tim=100 tm1.en=1
event ของ tm1 จะเกิดก่อน
covx usize,buffersize.txt,0,0 if(usize>=3) { // Data received ucopy data.txt,0,usize,0 // Disable timers tm0.en=0 tm1.en=0 recmod=0 }
ใน event ของ tm0 ปิด Read กรณีที่ time-out
covx usize,buffersize.txt,0,0 recmod=0 tm0.en=0 tm1.en=0
ในการ Debug ใช้วิธีง่ายๆ โดยการใช้ ucopy ได้ แต่จะไม่ได้ Clear current data จะต่อท้ายไป จนถึง 4096 byte. วิธีแก้ ต้องสั่ง เพื่อล้าง data
code_c
ตัวอย่าง debug gcode
code_c
print "?"
printh 0d 0a
delay=50
ucopy t0.txt,0,20,0
ก็จะแสดงผลล่างสุด
ปัญหา ของ Version Firmware ใหม่ ของ Nextion 2023, ในการต่อ Serial ต้อง set
ปัญหา ของ Version Firmware ใหม่ ของ Nextion 2023, ในการต่อ Serial ต้อง set
baud=115200
ก่อน จะ print หรือ ucopy คำสั่ง bauds เดิมที่สั่งหน้าแรก ไม่ทำงาน
การ ส่ง Enter ให้ส่งโดยใช้ printh
printh 0d 0a
วันพฤหัสบดีที่ 25 เมษายน พ.ศ. 2562
Intenet net time ในแบบ Text
https://nist.time.gov/actualtime.cgi?lzbc=siqm9b
code เป็นแบบนี้
code เป็นแบบนี้
public static DateTime GetNistTime(){DateTime dateTime = DateTime.MinValue;HttpWebRequest request = (HttpWebRequest)WebRequest.Create("http://nist.time.gov/actualtime.cgi?lzbc=siqm9b");request.Method = "GET";request.Accept = "text/html, application/xhtml+xml, */*";request.UserAgent = "Mozilla/5.0 (compatible; MSIE 10.0; Windows NT 6.1; Trident/6.0)";request.ContentType = "application/x-www-form-urlencoded";request.CachePolicy = new RequestCachePolicy(RequestCacheLevel.NoCacheNoStore); //No cachingHttpWebResponse response = (HttpWebResponse)request.GetResponse();if (response.StatusCode == HttpStatusCode.OK){StreamReader stream = new StreamReader(response.GetResponseStream());string html = stream.ReadToEnd();//<timestamp time=\"1395772696469995\" delay=\"1395772696469995\"/>string time = Regex.Match(html, @"(?<=\btime="")[^""]*").Value;double milliseconds = Convert.ToInt64(time) / 1000.0;dateTime = new DateTime(1970, 1, 1).AddMilliseconds(milliseconds).ToLocalTime();}return dateTime;}
สมัครสมาชิก:
ความคิดเห็น (Atom)